 (Colorado Chess Informant – July 2002) (Colorado Chess Informant – July 2002)
By NM Todd Bardwick Learning how to take advantage of and play against a backward pawn is one of chess’s most important positional themes. One of the most common backward pawn themes occurs out the opening when black has to suffer with a backward d6 pawn. The player with the backward pawn often strives to push the pawn in order to trade it off for an enemy pawn who isn’t as weak. By definition, the square in front of a backward pawn is also weak, since it can’t be supported by a friendly pawn. Often times this square is actually weaker than the square the backward pawn is sitting on and should be secured first. Once this is accomplished, your forces can either come to bear on the backward or attack elsewhere while your opponent is tied up defending the backward pawn. Here are two of my favorite teaching positions where white demonstrates how to punish black’s backward pawn. I. Boleslavsk-G. Lissitzin (Moscow 1956) 1.e4 c5 2.Nf3 d6 3.d4 cd4 4.Nd4 Nf6 5.Nc3 g6 6.Be3 Bg7 7.f3 0-0 8.Qd2 Nc6 9.0-0-0 Nd4 10.Bd4 Qa5 11.Kb1 e5 12.Be3 Be6 13.a3 Rfd8 14.Nb5 Qa4
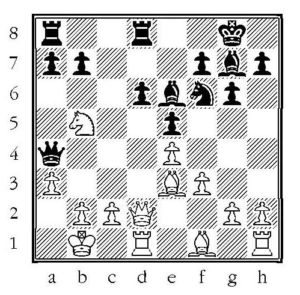
15.c4! (White sacrifices a pawn to secure the d5 square.) Bc4 16.Nc3 Qb3 17.Bc4 Qc4 18.Bg5! (Very nice! By eliminating the f6 knight, white owns the d5 square forever.) 18…Qe6 19.Bf6 Qf6 20.Nd5 Qh4 (White may be down a pawn in material, but has a huge advantage with the good knight vs. the bad bishop. With the players castled on opposite sides, white’s plan is to storm the black king with pawns in order to open up lines for his heavy pieces. 20…Qh4 is an attempt by black to block this plan. If 21.g3, then black intends 21…Qh3 and white must find a way to chase off the black queen in order to continue to advance his pawns successfully. If white offers a queen trade in this line, black will happily accept as the white queen is critical to white’s mating attack in the future.) 21.Qe2 Bf8
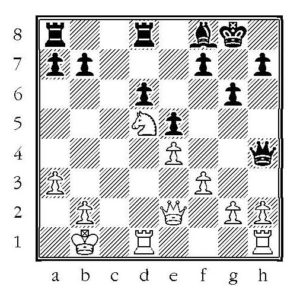
22.Qf1! (Excellent! This backward maneuver is point of the pawn sacrifice. Now with the white queen hitting h3, g3 can be played and white’s kingside pawns will be marching forward.) 22…Rac8 (Black has two plans…trade pieces to ease white’s kingside attack and attempt counterplay on the queenside against the white king. Note that this is closest black ever gets to the white king.) 23.g3 Qg5 24.h4 Qh6 (24…Qg3 loses the queen to 25.Rh3. Note that …Qh5 cannot be played now or in later positions due to the knight fork on f6.) 25.g4 g5 (Praying for white to play 26.h5 locking up the kingside. There isn’t much choice for black at this point though…white threatens g5, Nf6+, and h5 leading to a winning attack. Note once again the power of the knight on the square in front of the backward pawn…if black tries …Bg7 at some point, an unwelcomed visitor hops to e7!) 26.hg5 Qg5 27.Rh5 Qg6 28.g5! (28…Qh5, 29.Nf6+) 28…h6 29.Rh6! (29…Bh6, 30.Ne7+) 29…Qg5 (29…Qg7, 30.Nf6+) 30.Rh5! (Wow! Of course, again if 30…Qh5, then 31.Nf6+. White has successfully opened both the g and h files for his heavy pieces. If black tries 30…Qg3, white finishes him off nicely with 31.Qh1!, threatening 32.Rh8+ and 32.Rg1, so …) Black Resigns This second position arose from a Leningrad Dutch in the first round of the 1994 Denver Open.
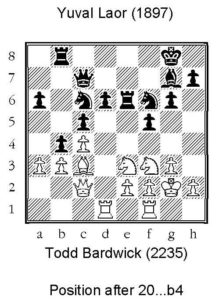
Once again black suffers with a backward pawn on d6, but he threatens to give white a backward pawn on b3. White’s plan is to lock up the queenside and attack the backward d-pawn and Black wants the queenside open so he can counterattack there. Most critical square on the board: d5 (the square in front of the backward pawn). Knowing all this, what should white do? White played 21.Bf6! (not only getting out of the pawn fork, but gaining more control of d5 by eliminating the knight that attacks it! Even though black’s bishop has total control of the a1-h8 diagonal, it is all dressed up with nowhere to go. The bishop would be strong if the a or b file were open so that the bishop could support a rook invasion. In this case, however, the knight is stronger than the bishop. Black is actually positionaly lost at this point…the d5 square belongs to white forever and black will always be tied down to defending the d6 pawn.) 21…Bf6 22.Nd5 Qb7 (This only encourages white’s next move. The black queen would help put up stiffer resistance by heading for the kingside.) 23.a4 (Now black’s queenside counter play is stopped forever.) 23…Rbe8 24.e3 Ne7 25.Kg1 Nd5 26.Rd5 (White wants the d-file open, not blocked with his own pawn.) 26…Rd8 27.Rfd1 Kf7 (Yuval played this move quickly and seemed pretty happy. He must have thought that he could batten down the hatches and that I wouldn’t be able to make any progress and be forced to settle for a draw. Now lets stop and evaluate the position again. Black really can’t do anything but shuffle his pieces back and forth; there is no queenside counter play, his defenses are tied to the d-pawn, and he definitely wants to keep the kingside closed. White’s rooks are well placed on the open file and the queen can join them in a move. The only white piece whose position can be improved is the knight. White eventually wants to open the kingside and expose the black king. But what is the hurry? Black can’t do anything to improve his position, so lets put the pieces on the optimum squares before opening the position. Hence…) 28.Ne1 Qc7 29.Nd3
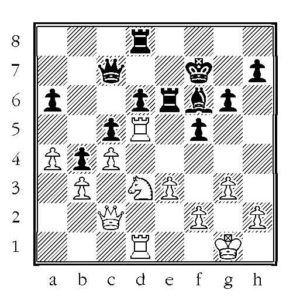
(Note how white has improved the position from the original diagram above. The white pieces head toward their optimum squares before they break through.) 29…Be5? (This loses quickly tactically. Without the blunder, White will win soon with some sequence of Nf4, Qd3 …tying black’s major pieces to the d-pawn…then comes the pawn break on the kingside with some combination of h4-h5, e4 and/or g4 depending on where the black pieces are placed at the time. Black will feel like he is playing defense against the St. Louis Ram offense as he is outmaneuvered on the kingside by white’s quick striking, active pieces.) 30.Nc5 Ree8 31.Nd3 Ke7 32.Nb4 Resigns |